[Grex]
 [Grex FAQ]
[VCR DVD Recorder Combo more...]
[Grex FAQ]
[VCR DVD Recorder Combo more...]
|
 Toshiba D-VR4, Sansui VRDVD5000/5000A Combo
|
|
Panasonic DMR-EZ475V, DMR-EZ475VK Combo
|
|
Sony RDR-VX535, RDR-VX555, RDR-VX560, RDR-VX655 Combo
|
|
Magnavox ZV420MW8
|
|
Samsung DVD-VR375
|
 Toshiba D-VR4, Sansui VRDVD5000/5000A Combo
|
| STEP 1 |
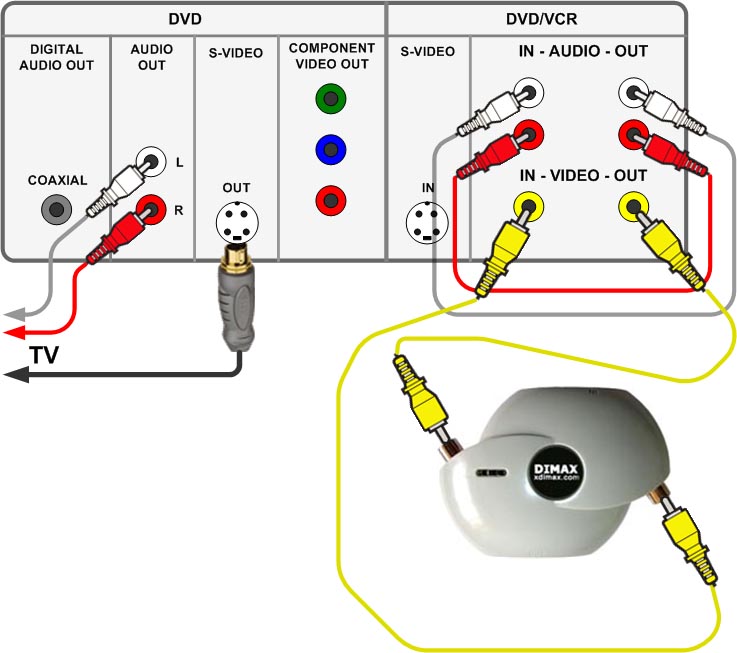
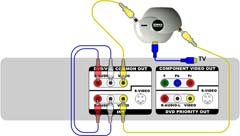
Please make the connection according to the diagram on the right.
Click the diagram to enlarge it.
|

|
| STEP 2 |
Place DVD disk media into DVD Recorder and
Source Video Tape into VCR.
|

|
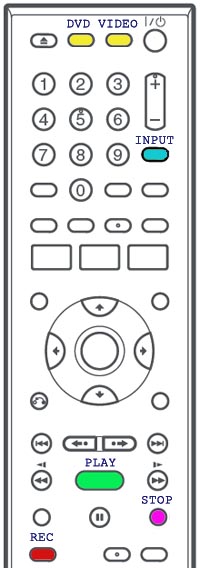
| STEP 3 |
Switch to the DVD mode.
In DVD mode Select INPUT1 with INPUT SELECT button on remote control
|
| STEP 4 |
Press Record. DVD Recorder must start recording from INPUT1.
Do not use DUBBING button!
|
| STEP 5 |
Right after the DVD recording started switch to
the VCR mode and press play.
VCR should start to play the Video Tape you are recording from.
Once again Do not use DUBBING. It will not work!
Click to see why
|
|
|
Panasonic DMR-EZ475V, DMR-EZ475VK Combo
|
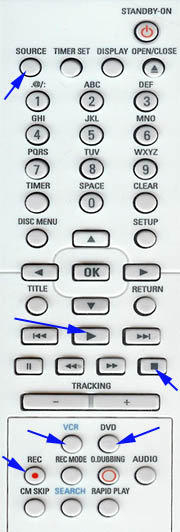
| STEP 1 |
Using DRIVE SELECT button on remote select DVD mode.
The DVD indicator on front panel will light up.
Put the destination DVD media into DVD drive.
With INPUT SELECT button on remote select IN1. The IN1
should appear on the front panel LCD.
|
|
| STEP 2 |
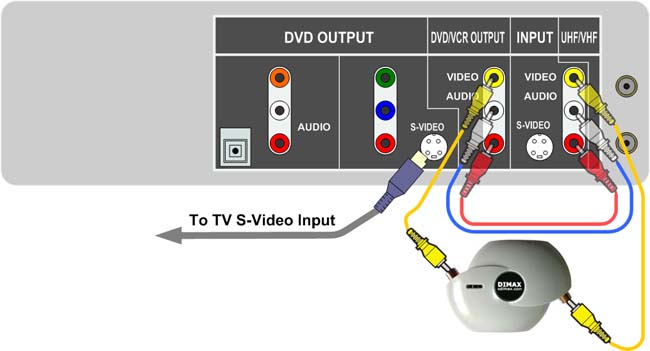
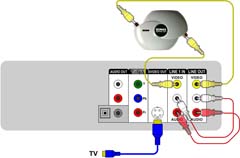
Make the hook up according to the diagram on the right.
Click the diagram picture to enlarge it. The only way to monitor
recording on TV is to connect Grex S-Video output to TV S-Video
input.
|
|
| STEP 3 |
Put the source VHS into VHS drive and position the tape to the point
you want to start the recording from. Stop VHS where.
|
STEP 4
Recording
|
Go to DVD mode (using DRIVE SELECT on remote) and press RECORD.
The REC message should appear on front panel LCD. Immediately after
that go to VHS mode (again using DRIVE SELECT on remote) and press
PLAY. The VHS playback and DVD recording are now in progress...
Grex light indicator in this period should be steady or fast
blinking red.
|
|
|
STEP 5
|
When you will need to stop recording press STOP in VHS mode.
This will stop VHS playback.
Switch to DVD mode and press STOP.
This will stop DVD recording. You will see the message
"Writing the information on the disk..." for a few time.
Now you can play the recorded video. You may need to finalize
new DVD if you are going to watch it on another DVD player.
|
Because of the loopback connection picture on TV in steps 3,4,5 may be
smeared. But while recording in progress (step 4) you should see the recorded
video clear.
|
|
Sony RDR-VX535, RDR-VX555, RDR-VX560, RDR-VX655 Combo
|
| STEP 1 |
Select VCR mode with VIDEO button on remote. You should see
VIDEO
indication on front panel.
Put VHS into VCR drive and position it to the place you want to
start recording from. Stop VHS where.
|
|
| STEP 2 |
Select DVD mode with DVD button. Get
DVD
indication on front panel.
Put the destination DVD media into DVD drive.
With INPUT button on remote select LINE1.
|
|
| STEP 3 |
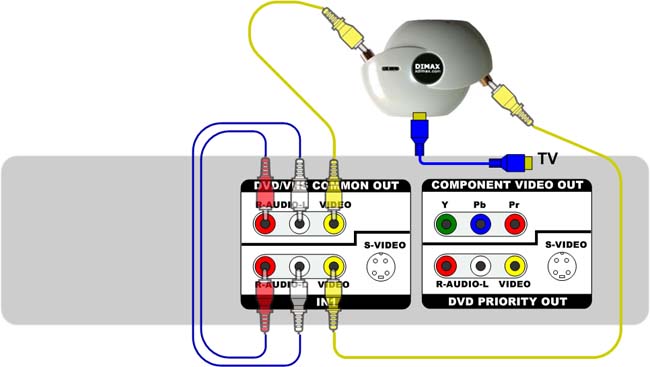
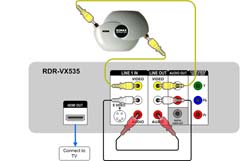
Make the hook up according to the diagram on the right.
Click the diagram picture to enlarge it.
|
STEP 4
Recording
|
Staying in DVD mode press REC to start DVD recording. The red
indication should appear on front panel. Immediately after
that go to VHS mode (VHS button on remote) and press
PLAY. The VHS playback and DVD recording are now in progress...
Grex light indicator in this period should be steady or fast
blinking red.
|
|
|
STEP 5
|
When you will need to stop recording press STOP in VHS mode.
This will stop VHS playback.
Switch to DVD mode and press STOP.
This will stop DVD recording. You will see the message
"Updating the information of disk..." for a few time.
Now you can play the recorded video. You may need to finalize
new DVD if you are going to watch it on another DVD player.
|
Because of the loopback connection picture on TV in steps 3,4,5 may be
smeared. But while recording in progress (step 4) you should see the recorded
video clear.
|
|
Magnavox ZV420MW8
|
| STEP 1 |
Select VCR mode with VCR button on remote.
Put the VHS into VCR drive and position it to the place you want to
start recording from. Stop VHS where.
|
|
| STEP 2 |
Select DVD mode with DVD button.
Put the destination DVD media into DVD drive.
With SOURCE button on remote select E1 REAR input.
Make sure input is configured as COMPOSITE. To check it press SETUP
and select General_Settings -> Video -> Video_Input -> E1(Rear) -> Video_IN.
|

|
| STEP 3 |
Make the hook up according to the diagram on the right.
Click the diagram picture to enlarge it.
|
STEP 4
Recording
|
Staying in DVD mode press REC to start DVD recording. The red
indication should appear on front panel. Immediately after
that go to VHS mode (VHS button on remote) and press
PLAY. The VHS playback and DVD recording are now in progress...
Grex light indicator in this period should be steady or fast
blinking red.
|
|
|
STEP 5
|
When you will need to stop recording press STOP in VHS mode.
This will stop VHS playback.
Switch to DVD mode and press STOP.
This will stop DVD recording. You will see the message
"Writing to disk ...%" for a few time.
Now you can play the recorded video. You may need to finalize
new DVD if you are going to watch it on another DVD player.
|
Because of the loopback connection picture on TV in steps 3,4,5 may be
smeared. But while recording in progress (step 4) you should see the recorded
video clear.
|
|
Samsung DVD-VR375
|
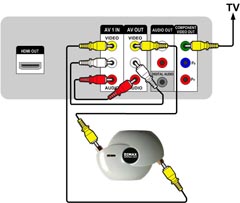
| STEP 1 |
If your TV has component video input connect Samsung Y,Pb,Pr into
corresponding TV Y,Pb,Pr inputs. Otherwise connect Samsung Y into
TV composite video input. In this case you will get black and white
picture. This is normal.
|
|
| STEP 2 |
If your TV does not support 100Hz video you will not see stable
picture. To fix it, disable progressive scan in Samsung.
Go to SETUP--->Video--->Progressive--->OFF.
|
|
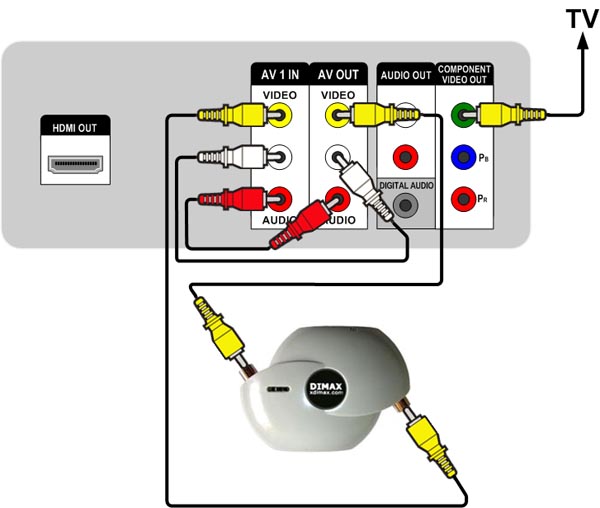
| STEP 3 |
Make connection shown on the diagram.
|
|
STEP 4
|
On remote control press "DVD" button and then press "Input Sel."
until you see AV1 on VR375 lcd display.
|
|
STEP 5
Recording
|
Put DVD media into DVD driver and VHS into VCR driver.
Select DVD pressing "DVD" on remote. Press "REC".
Select VCR pressing "VCR" on remote. Press "PLAY".
Now recording from VHS to DVD is in progress. You should see
playback on the TV.
|
|
|
|